PandocでMarkdownからPDFを作成する
最初はsphinxにしようと思っていたがいつのまにかPandocになっていたんだ。
多様なフォーマットに対応!ドキュメント変換ツールPandocを知ろう
Pandocのインストール
pandocをbrew caskでインストール
1 2 3 | |
試しにHTMLを生成してみる
1 2 3 4 5 6 | |
MarkDown <---> reStructuredText
1 2 3 4 5 | |
入力形式・出力形式を明示的に指定
1
| |
MaxTexのインストール
MaxTex.pkgをミラーサイトからダウンロード
例えば
http://oku.edu.mie-u.ac.jp/~okumura/texwiki/?Mac#mactex
からMacTex.pkgをダウンロード。
2.3Gもある…
インストールウィザードからインストール
ダブルクリック→ウィザードに従ってインストール 環境変数も自動で設定される。
作業中のシェルには反映されない。 /etc/paths.dでPATHへの判定は何かしている模様。
1 2 | |
/usr/texbinがPATHに存在することを確認。
環境設定
1
| |
このアップデートもけっこう時間かかった。
あとはWikiに従って設定していき、
1
| |
1 2 3 4 5 6 | |
1
| |
1 2 3 4 5 6 7 8 9 | |
PDF作成
実際にPDFができましたとさ。
1
| |
長いのであとでaliasの設定をしておきたいところ。
以上。
Elasticsearch Getting Started
Elasticsearch referenceの学習ノート.
getting started
Elasticsearchはハイスケーラブルな全文検索エンジンで大規模なデータを リアルタイムに近い速度で検索できる
index/type/document
what is an elasticsearch index?
MySQL => Databases => Tables => Columns/Rows
Elasticsearch => Indices => Types => Documents with Properties
cluster&node, shards&replicasedit
single nodeでちょっと遊んでみるだけなので必要に迫られたら
インストール
1.4の場合、java7以上Oracle JDK version 1.8.0_25推奨とのこと
1 2 3 4 5 6 7 8 | |
起動するときにclusterとnode名を指定する場合は以下
1
| |
今はsingle nodeでやっているのでcluster.nameはデフォルトのelasticsearch
REST APIs
- Check your cluster, node, and index health, status, and statistics
- Administer your cluster, node, and index data and metadata
- Perform CRUD (Create, Read, Update, and Delete) and search operations against your indexes
- Execute advanced search operations such as paging, sorting, filtering, scripting, faceting, aggregations, and many others
ヘルスチェックAPI
statusがgreenなら全機能正常レプリカ割当済
yellowの場合は全機能正常レプリカ未割当
1 2 3 | |
clusterのnode一覧
1 2 3 | |
CRUD API
index一覧
まだ作成されていない状況
1 2 | |
index作成
PUTでcustomerというindexを作成
prettyでレスポンスのJSONを綺麗にフォーマットして表示
1 2 3 4 | |
デフォルトではprimary shards : 5, replica : 1で作成される
1 2 3 | |
statusがyellowなのはnode数が1のためレプリカ割当がされていないため
Document作成
customerのindexにexternalのtypeをid=1としてdocumentを作成する
前節のようにindexをあらかじめ作成しておかなくても自動で作成される
1 2 3 4 5 6 7 8 9 10 11 | |
GETで作成したドキュメントを取得できる
_sourceには上記で追加したJSONが格納される
1 2 3 4 5 6 7 8 9 10 11 12 | |
index削除
1 2 3 4 5 6 | |
1 2 3 4 5 6 7 | |
REST ApiのURLパターンは以下のようになっている
1
| |
データの追加・変更・置換
前節のようにid: 1のドキュメントを追加し
1 2 3 4 5 6 7 8 9 10 11 | |
同一idに対してPUTしたところ、
_versionがインクリメントされ、
created : falseでレスポンスが返却された
1 2 3 4 5 6 7 8 9 10 11 | |
idを指定しない場合はPUT``POSTメソッドを利用する
(ランダムのidが付与される)
1 2 3 4 5 6 7 8 9 10 11 | |
ドキュメントの修正
前節がレコードの登録に関する操作とすると、こちらはフィールド値の更新操作に値する
1 2 3 4 | |
ctx._sourceで自身のフィールド値を利用することができる
1 2 3 4 | |
以下のようにupdateは現在のところ単一行への操作しかできない模様
Note that as of this writing, updates can only be performed on a single document at a time. In the future, Elasticsearch will provide the ability to update multiple documents given a query condition (like an SQL UPDATE-WHERE statement).
ドキュメントの削除
特に違和感なく、GETの要領で削除できる
1 2 3 4 5 6 7 8 | |
/_queryで条件を利用できる(取得時の条件指定は後述?)
1 2 3 4 5 6 7 8 9 10 11 12 13 14 15 | |
Bulk API
一括処理のAPIを利用することでネットワークのラウンドトリップを小さくできる
ドキュメントの一括追加
1 2 3 4 5 6 7 8 9 10 11 12 13 14 15 16 17 18 19 20 21 22 23 24 25 26 27 | |
ドキュメントの修正と削除
1 2 3 4 5 6 7 8 9 10 11 12 13 14 15 16 17 18 19 20 21 22 23 24 25 26 27 | |
追加と修正時には引数にドキュメント内容が、削除の場合は引数なしで操作する
一括操作は上から順に行われ、ひとつひとつの操作が正常に終了したかどうかは
レスポンスのstatusで確認できる
検索API
JSONファイルから取り込み
サンプルデータの一括登録
1 2 3 4 | |
search api
いずれかの形式で利用できるが、bodyを利用するとより表現が豊か
- REST request URI
- REST request body
REST request URI
q=*のURLパラメータでクエリ指定する(*ではすべてのindexを取得する)
1
| |
REST request body
上記の*に相当するmatch_allの表現
1 2 3 4 | |
response data
1 2 3 4 5 6 7 8 9 10 11 12 13 14 15 16 17 18 | |
- took
- 検索に要した時間(ms)
- timed_out
- 検索がタイムアウトしたかどうか
- _shards
- 検索したshardの数
- hits
- 検索結果
- hits.total
- 結果件数
- hits.hits
- 検索されたドキュメント(デフォルトでは10件取得)
- hits.hits._score, hits.max_score
- 今の所は忘れておく
検索結果について
一度検索結果が返却されたのちはサーバーサイドではリソースを使っていないので 少しずつフェッチしてデータを取得するようなことはできない
その他修飾句
- from n
- size n
- sort { “sorted_field” : {“order” : “asc”/“desc”} }
searches
フィールド名自体で検索
1
| |
フィールド値で検索
1 2 3 | |
条件句のAND/OR/NOR
1 2 3 4 5 6 7 8 | |
filters
前節にあった_scoreはクエリとのマッチ度合の指標であるが
filtersはこの対象になく、その他クエリと比較して処理が早い。
メモリにもキャッシュされるため同一の検索がされる場合に処理が早い。
- Filters do not score so they are faster to execute than queries
- Filters can be cached in memory allowing repeated search executions to be significantly faster than queries
- filtered query
- range filter
1 2 3 4 5 6 7 8 9 10 11 12 13 14 15 16 | |
filterを使うべきかqueryを使うべきか
マッチ度合を利用したい場合はquery、そうでない場合はfilter
In general, the easiest way to decide whether you want a filter or a query is to ask yourself if you care about the relevance score or not. If relevance is not important, use filters, otherwise, use queries. If you come from a SQL background, queries and filters are similar in concept to the SELECT WHERE clause, although more so for filters than queries.
aggregations
SQLでいうところのGROUP BY
1 2 3 4 5 6 7 8 9 10 11 | |
1
| |
VPSを利用してPeerCast視聴環境をつくる
グローバルIPなくてポート解放できないから仕方なしに作ったけど
思いのほか使い勝手がいいのでオススメすべく手順残しておく
目標
VPSにPeerCastとPecalisをインストールしてデバイスフリーな視聴環境をつくる
- グローバルIPもらえないネット環境の人もPeerCastが視聴できる
- 視聴するマシンごとにクライアントのインストールしなくていい
- 実況スレへの書き込みもブラウザの同じ画面からできる
- AndroidやiOSからも視聴できるらしい
ConoHa VPS
以前に3000円クーポンx2をもらっていたのでConoHa VPSに
そうでなくとも新規登録時に1500円分のお試しクーポンがもらえます
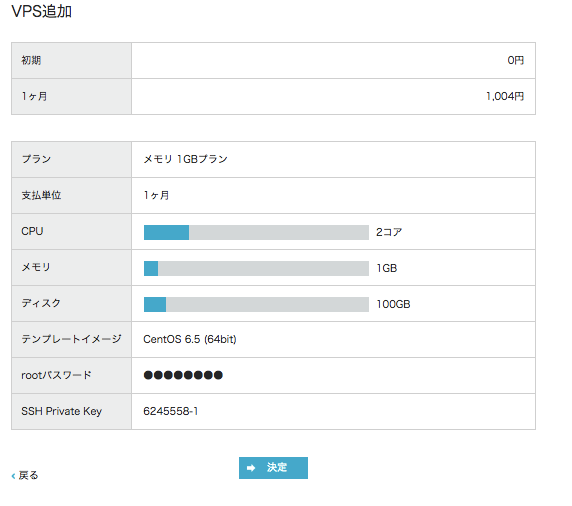
標準プラン最小構成で月1004円、Windowsプランなら月2084円(2014/12現在) 1日使って削除すれば1日分の日割りの値段(電源OFFしてもダメ)
電話認証は必要だけど初回費用ないし カード登録しなくていいしで比較的気楽に利用できそうな感じ。
トラフィックで課金されるクラウドより定額のVPSのほうが安心。
使用ツール・バージョン
- CentOS 6.5 64bit (ConoHa VPS テンプレートイメージ)
- Mono 3.10.0
- PeerCastStation 1.9.0.2
- Pecalis 1.5.3
OSはConoHaのデフォルトがCentOSになっているので選択。
その他は現時点での最新を利用。
VPS起動
テンプレートイメージのCentOS6.5(64bit)を選択してVPSを作成。
パスワードを入力するほかは特に何も変更せず。
起動が完了したら
rootユーザでVPS作成時に設定したパスワードでログイン。
(補足)Webコンソール
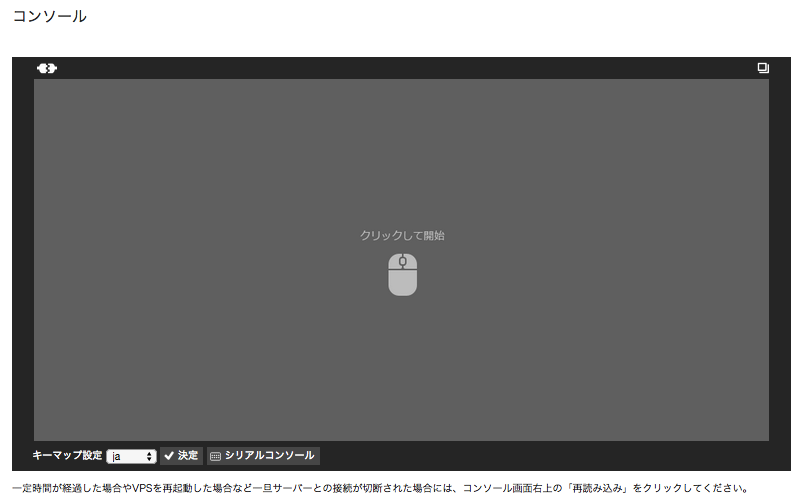
コマンドのコピペはここから

少し放置するとすぐ切断されてしまう。再接続するにはこれを

若干面倒な点もあるので秘密鍵をダウンロードしてSSH接続するほうが楽かも。
必要なパッケージをインストール
GUIのインストール
PeerCastStationの設定画面はブラウザから行う必要があるので GUI環境をインストールする。PecalisもGUI上のシェルから起動しないとエラーになる模様。
1
| |
ブラウザ(Chromium)のインストール
Chormeのオープンソース版をインストールする。
1 2 3 | |
Monoのインストール
.NETアプリをCentOS上で動かすためにMonoをインストールする。
1 2 3 | |
と、パッケージインストールしても
後々にlibgdiplus.soがNotFoundですと怒られてしまうようなので
下記のようにconfigファイルを編集する。
1 2 3 | |
ファイル末尾付近の
libgdiplus.soを/opt/mono/lib/libgdiplus.soに書き換える。
1 2 3 4 | |
libgdiplus.so自体は/usr/local/libにインストールされているので
ファイアーウォールの設定(ポート開放)
PeerCastに必要なTCP:7144とPecalisのTCP:7134のポートの通信を許可しておく。
1
| |
REJECTから始まる行が5行目にあるのを確認したのち、
1 2 3 4 | |
※ 特定のアクセス元からしか通信を許可しないようにしたほうがいいのかも。
GUIモードに変更して再起動する
ユーザの追加
PeerCastを動かすユーザーを作成しておく。
1 2 3 4 | |
OSがGUIモードで立ち上がるように修正
1
| |
上記のファイルを
1
| |
から
1
| |
に修正
日本語環境に変更
英語環境より日本語のほうがわかりやすいので
1
| |
上記ファイルを
1
| |
から
1
| |
に修正
1
| |
再起動
1
| |
再起動が完了するとWebコンソールにGUIの画面が表示される
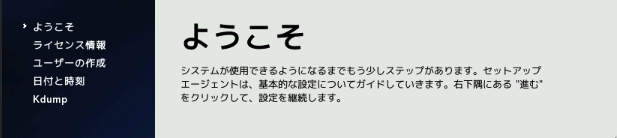
初回起動時は上記のような画面が表示されるが全て進むで完了する
(途中メモリが足りない等言われたらOKとしておく)
視聴ツールのインストール
以降、作成したpeercastユーザでログインして進める
端末を起動
アプリケーション>システムツール>端末
PeerCastStationのインストール
ダウンロードしてきて解凍する。
1 2 3 | |
Pecalisのインストール
同じくダウンロードして解凍する。
1 2 3 | |
PeerCastStationの起動
1
| |
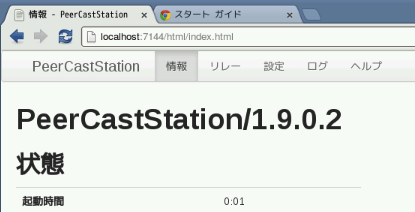
PeerCastStationの設定
インターネット>chromiumでブラウザを起動して http://localhost:7144 にアクセスする。
メモ:ctrl+zでプロセスを一時停止させて復帰させるとアクセスできなかった
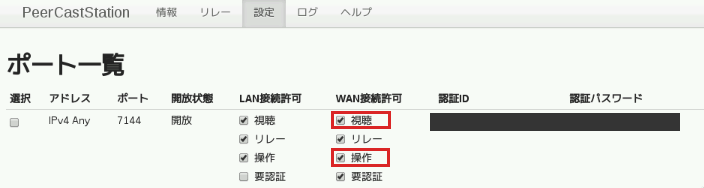
設定タブから設定を行う
- WAN接続許可の「視聴」と「操作」にチェックする
認証IDと認証パスワードは後ほど利用する
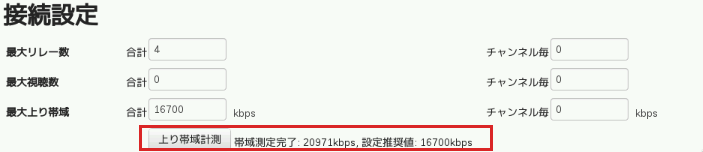
- 上り帯域計測ボタンを押して最大上り帯域を設定する
詳しくは http://localhost:7144/help/settings.html を確認
- 自動切断を行うように設定しておく

ローカルマシンからブラウザで設定画面を開けることを確認
VPSに接続しなくてもどこからでもブラウザで設定画面を開けることを確認する
http://VPSのIPアドレス:7144
にアクセスすると

のように認証ID、認証パスワードを求められるので入力する。
Pecalisの準備
- Pecalisアカウントの作成
Pecalisアカウントの新規作成 もしくはTwitter等の外部サイトアカウントでログイン
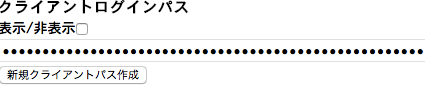
- 設定>アカウント設定>クライアントログインパスをコピー
Pecalisの起動
初回起動時にクライアントログインパスを要求される
1 2 3 4 | |
シェルから切り離して実行したい場合は次のようにする
1
| |
セットアップが出来ているか確認。
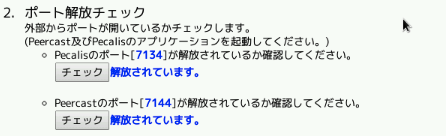
ちゃんとポートが解放されていればOK
視聴する
ローカルマシンでブラウザでPecalisサイトにアクセスして視聴
好きなチャンネル選んで実況しよう!
お疲れ様でした!
SSH鍵設定の見直し
github, heroku等で個人用途にも関わらず
特に理由もなくSSH鍵をそれぞれ個別に作成してしまっていたので
デフォルトの~/.ssh/id_rsa(.pub)で統一してしまいたいの巻。
乱造されたSSH鍵…
不要なものは削除して統一したい
1 2 3 4 5 6 7 8 9 | |
SSH Key Pairの作成
ssh-keygenで特にオプション指定しないで作成すると2048bitのRSA鍵が生成される。
1 2 3 | |
-Cで入力したコメントがgithubのGUI等で確認できるので入力しておくとよい。
sshコマンドの-iオプションで秘密鍵のファイルを指定しない場合は
~/.ssh/id_rsaを読み込んでくれるのでファイル名もデフォルトのままで都合が良い。
パスフレーズを設定しておくと秘密鍵自体も暗号化した形で保存されるので ファイル覗かれても少し安心。もし変更したい場合は、
1
| |
で一度設定したパスフレーズを変更できる。これはあくまでローカルマシンに保存されている 秘密鍵に対する変更なのでリモートで何かしないといけないわけではない。
GitHubにSSH Keyを登録しなおす
今まで利用していた鍵に代わって、ブラウザでPersonal settings > SSH Keys > Add SSH Keyから画面に従って公開鍵を登録。
pbcopyでクリップボードを利用すると楽。登録するとGitHubからnew public key addedなメールが届く。
1
| |
公開鍵認証で接続できるかテストしてみる。
1
| |
パスフレーズの入力ダイアログが表示されるので入力。
1 2 | |
こんな感じのメッセージが表示されればOK.
この時点でssh-add -lを実行すると秘密鍵がssh-agentに登録されているはず。
1 2 | |
HerokuにSSH Keyを登録しなおす
Heroku Toolbeltはインストール済として…
1 2 3 | |
現在登録されているKeyを確認の上、除去
1 2 | |
もしくは全消去して
1
| |
あらためて登録する。
1
| |
どれを追加するのか聞かれるので
~/.ssh/id_rsaに該当する番号を選択する。
登録できたら接続できるかテスト。
1
| |
ssh-add -lで~/.ssh/id_rsaが登録されているのであれば
パスフレーズは聞かれない。
何回もパスフレーズ入力するの面倒くさい
-Kオプション付けてkeychainに登録するのはどうだろう。
1
| |
man ssh-addによれば-Kは
1 2 3 | |
良さげな感じ。
VPSにSSH接続した状態でGitHub, HerokuにSSH接続
ssh -Aするか~/.ssh/configでForwardAgent yesを指定してあげれば
ローカルマシンの秘密鍵を利用してリモートマシンでSSH公開鍵認証できて便利ね。
エネルギー尽きた。
Ruby on Rails Tutorial(2)
Ruby on Rails Tutorial の学習メモの続き。
第2章 デモアプリケーション
1章のおさらい的な
デモアプリケーションの作成
1 2 | |
開発環境のgemをインストール
1 2 3 | |
gitでバージョン管理下に
1 2 3 | |
githubにpush
1 2 | |
scaffoldでリソース作成
rails generateスクリプトにscaffoldコマンドを渡すことで生成する
1
| |
Ruby文法的にはscaffoldが関数でUserが第一引数で残りは
nameとemailのシンボルをキーとした`ハッシュといったところか。
RESTfulなルーティング
ルーティングはconfig/routes.rbで管理してそうな感じ。
いかにもリソースといったルーティングルールをresources :users
で生成できてそう。
| method | url | action | comment |
|---|---|---|---|
| GET | /users | index | show all user |
| GET | /users/1 | show | show id=1 user |
| GET | /users/new | new | show new user input |
| POST | /users | create | create user |
| GET | /users/1/edit | edit | show id=1 user input |
| PATCH | /users/1 | update | update id=1 user |
| DELETE | /users/1 | destroy | delete id=1 user |
GETはページの取得POSTは新しいリソースの作成PUTPATCHはリソースの更新DELETEはリソースの削除
デモアプリケーションのデプロイ
githubに登録
1 2 3 | |
前回は飛ばしてしまってたので気づかなかったけど
1 2 | |
git push heroku masterでエラー
1 2 3 4 5 | |
herokuのSSH設定
SSH Keys 手順メモ
いまいち適当に使ってるので。
1
| |
-tで生成する鍵の種類を指定する。 指定がない場合はSSH2のrsa鍵を生成するとあるので省略できそう-Cでコメント。コメントには鍵の用途やその他情報を書いておける。-fで鍵を格納するファイル名を指定。-bで生成する鍵のbit数を指定。RSA鍵のデフォルトは2048bitで十分な桁数だと考えられてる。-pですでにある秘密鍵ファイルのパスフレーズを変更できる。
ssh-agentとかssh-addとか
コマンドの意味理解しないで使ってるので後で調べること。